We get this call quite often.
"I used the Box/HEX conversion tool and the HEX code it gave me isn't available to choose from."
If you will look directly to the right of the box code and the corresponding HEX code, you will see the suggested calibration. This will be the HEX code you chose from when using the files off of our server.

We've made quite a few changes this year, including no longer offering Hydra custom tuning. We are currently focusing on what we do best: product development. If you have specific tuning questions, feel free to call our office.
PHP is no longer producing the Gryphon programmer and no longer offers custom tunes for it. If you already have one for 2004-2008 F-150s, we can still unlock the device if it is locked, but the only tunes available are the original canned tunes.
A performance Programmer replaces the factory tuned specifications inside the PCM (Powertrain Control Module). This gives the ability to alter functions like timing, fuel, RPM and others.
Gasoline powered vehicles can see moderate gains in both horsepower and torque by recalibrating the fuel and timing curves to achieve optimum efficiency. Most customers notice an increase in their fuel mileage, with reported gains of as much as 3 MPG. Vehicles with automatic transmissions can also obtain significant increases in performance as well as the service life of the transmission by custom tuning the shift points, delays, and pressures. Speed and RPM limiters can also be modified to suit the needs of the customer.
Power Stroke Diesel vehicles will benefit from a significant increase in horsepower and torque by careful recalibration of fuel curves, injection timing tables, and turbo boost maps. Most customers notice a substantial improvement in their fuel economy -- up to 5 mpg, depending on engine size and gear ratio -- especially under moderate to extreme loads such as pulling a heavy trailer or boat. As with the gas vehicles, automatic transmissions can also obtain significant increases in performance as well as the service life by custom tuning the shift points, delays, and pressures. Speed and RPM limiters can also be modified to suit the needs of the customer.
Simply put, no, we don't because it goes against our business philosophy which, in part, is to provide safe, reliable products to our customers.
For those who don't know, this is a calibration that uses the EBV (Exhaust Backpressure Valve) as a makeshift exhaust brake. While this setup may work reasonably well for lightly loaded vehicles, we generally do not recommend this type of calibration... at least not for automatic transmission vehicles. There are a few reasons we don't recommend this.
First, in order to transfer the energy of the moving vehicle to the engine during deceleration, two things must occur: the torque converter must remain locked, and the coast clutch must be engaged. The problem with this is that the coast clutch on a stock transmission only has 3 friction plates, and these are smaller than the standard forward clutches. On 2001 and later transmissions, you also run the possibility of damaging the intermediate sprag or "diode," which will result in an immediate transmission teardown. Again, lightly loaded vehicles would have less of a problem with this, but the general idea of an exhaust brake is to be able to slow larger loads without overheating the standard brake system. It is these types of loads that can cause transmission damage. Obviously, a manual transmission would be free from these types of situations.
Second, whenever you increase exhaust backpressure, you need to make sure that the exhaust valve springs are capable of preventing the pressure in the exhaust system from lifting the exhaust valve from the valve seat, as this would result in a collision with the piston. Normal valve spring seat pressure is 70-75 PSI for NEW valve springs and deteriorates from there. Given that the surface area of the back of the exhaust valve is approximately 1.9 square inches, it would take only 40 PSI of exhaust pressure to lift the valve off the seat, even with new valve springs.
To put it simply, if you plan to use an exhaust brake, either through the use of the EBV or by purchasing an aftermarket stand alone unit, you will need to consider the condition of your transmission and exhaust valve springs in order to ensure safe, reliable operation.
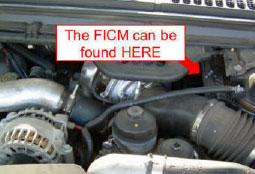
We are frequently asked, "Where is my PCM located?" and "Where can I find my Calibration code?" These are relatively easy to find since they are in the same location. The only difference which vehicle you are trying to locate this on.
On '97 to '03 F-150 trucks, the PCM is located on the passenger's side firewall directly behind the battery.
On the '94 to '03 F-250 and larger trucks, the PCM is located on the driver's side firewall about 3" below the brake booster and about 3" away from the fender. On these vehicles, it is extremely difficult to get a clear view of the PCM connector so you will most likely need a flashlight and a small mirror (or even a butter knife) in order to read the code from the sticker.
The PCM has a 1" x 5" wiring harness connector which has a 10mm bolt located directly in the center of it. Keep in mind that this bolt is used to retain the harness in the PCM connector and must be unscrewed in order to disconnect the harness from the PCM when installing your chip.
On the side of the PCM connector facing the driver's fender, there is a white sticker that contains the Part Number and Calibration information. The Part Number is easy to identify because it will always contain "-12A650-" in the middle of it. The Calibration code (also called the "Box" code or "Tear Tag" code) is a 4 digit code that is composed of 3 letters and 1 number.
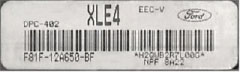
In this example, the PCM Part Number is "F81F-12A650-BF" and the Box or Calibration Code is "XLE4". For reference, the "DPC-402" is the hardware designation and is used to identify the Circuit Board used in the PCM. In the event a replacement PCM is needed, any PCM with a matching "DPC" number can be used, although you will need to have the PCM reflashed to the proper Calibration code.
When ordering a chip, you will always need to refer to either the part number or the Box code. This helps us to be able to correctly build your calibrations and ensure that we are using the same base calibration that was designed for your vehicle. Otherwise, you may experience certain drivability issues, cold start problems, or erratic shifting.
In the event that there isn't a sticker on the PCM (Yes, it has happened), we can take an educated guess as to which calibration we need to use based on model year, options and other data. However, there are close to 400 different 7.3L calibrations and almost 1000 F-150 calibrations, so you can see how important it is to have the correct code. Even though it's a little tricky, it's worth the few minutes it takes to locate the correct PCM code as it can save you a lot of headache down the road.
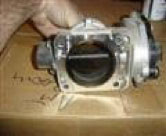
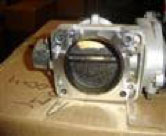
It has come to our attention that there have been situations where the vehicle has developed an erratic, unstable or low idle after reprogramming the PCM. The most common cause for this problem is the carbon buildup around the throttle plate which causes airflow issues at idle.
Over a period of time, the PCM is able to automatically compensate for the slow loss of airflow past the throttle plates by either opening the idle air control (IAC) valve more (on cable actuated throttle) or by opening the throttle plate(s) wider (on Electronic Throttle) to increase airflow. When the PCM is reprogrammed, this learned setting is erased. On older vehicles, it wasn't a very big problem because the learning curve for the idle was fairly quick and the vehicle could be back to normal speed in about 10 minutes. However, electronic throttle bodies have a much slower learning time which could take weeks or months to fully recover.
So, you have an electronic throttle vehicle. Now, what do you do? Actually, there is a really simple fix: Clean the throttle body. In most cases, the throttle body is fairly easily accessible using only simple hand tools. Just remove the inlet tube assembly to achieve access to the throttle opening. Once there, take a shop towel or rag and wrap it around the end of a toothbrush or some other plastic handled device. DO NOT use a screwdriver as you can gouge the side of the throttle body and damage the bore. Apply a little Carb Cleaner or Lacquer Thinner to the towel, open the throttle plate and clean the throttle bore. You will also want to clean the edges of the throttle plate as there will be carbon buildup on there as well. Ideally, you will want to remove the throttle body to perform a thorough cleaning, but the above steps should at least help improve your idle quality.
Now, here's an important word about solvents and plastic intakes: the 5.4L F-series, along with a few other vehicles, have a composite plastic intake manifold. For the uninitiated, plastic and solvents DO NOT MIX! Carb Cleaner will damage your intake if you spray it directly into the throttle body. On those vehicles, we STRONGLY recommend you remove the throttle body to clean it or run the risk of damage.
The pictures below are a before and after comparison from a 4.6L throttle body. It is representative of practically any ETC (Electronic Throttle) style unit although manual styles are virtually identical.


The following procedure is designed to execute and complete the OBDII monitors and to clear the Ford P1000, I/M readiness code. To complete a specific monitor for repair verification, follow steps 1 through 4 then continue with the step described by the appropriate monitor found under the "OBDII Monitor Exercised" column. When the ambient air temperature outside is 4.4° to 37.8°C (40° to 100° F), or the altitude is above 2,438 meters (8000 feet), the EVAP monitor will not run. If the P1000 code must be cleared in these conditions, the PCM must detect them once (twice on some applications) before the EVAP monitor can be "bypassed" and the P1000 cleared. The EVAP "bypassing" procedure is described in the drive cycle.
The OBDII Drive Cycle will be performed using a scan tool. Consult the instruction manual for each described function. NOTE: A detailed description of a Powertrain Control Module (PCM) Reset is found in this section; refer to the table of contents.
Drive Cycle Recommendations:
- Most OBDII monitors will complete more readily using a "steady foot" driving style during cruise or acceleration modes. Operating the throttle in a "smooth" fashion will minimize the time required for monitor completion.
- Fuel tank level should be between 1/2 and 3/4 fill with 3/4 fill being the most desirable.
- The Evaporative Monitor can only operate during the first 30 minutes of engine operation. When executing the procedure for this monitor, stay in part throttle mode and drive in a smooth fashion to minimize "fuel slosh".
WARNING: STRICT OBSERVANCE OF POSTED SPEED LIMITS AND ATTENTION TO DRIVING CONDITIONS ARE MANDATORY WHEN PROCEEDING THROUGH THE DRIVE CYCLES.
Download ODBII SYSTEM READINESS TESTING TABLE
There have been several concerns about whether or not a manufacturer can void the warranty on a vehicle because the vehicle owner has installed an aftermarket product on his/her vehicle. To fully understand how performance products may affect the warranty on your vehicle, you need to understand the law regarding warranties.
The Magnuson-Moss Warranty Act was introduced in 1975 and requires manufacturers to provide a means for consumers to fully understand the warranty protection they are entitled to when purchasing a product. The act only applies to written warranties and the protection is provided only to the final purchaser (the consumer. The law states that no manufacturer may deny a warranty claim based solely on the use of aftermarket components or services not provided by the manufacturer. In order to deny a warranty claim, the manufacturer must show by means of reasonable proof that component or service in question is the direct or indirect cause of the failure of the part(s) for which warranty repair is being sought. It is important to understand that this applies to only replacement parts or services (per Magnuson-Moss Warranty Act PART 700 > § 700.10 Section 102(c)), not modifications or custom parts. An aftermarket programmer falls outside of the realm of replacement parts and if a powertrain failure should occur, it is possible that the manufacturer will deny a warranty claim for repair or replacement of the damaged item(s).
However, it is not legal for a manufacturer to arbitrarily void the warranty of a vehicle or deny a warranty claim based solely on the use or presence of aftermarket products. Again, the manufacturer must be able to show reasonable proof that the aftermarket product was directly or indirectly responsible for the failure of the part(s) for which warranty repair is being sought.
If running Vista, Win 7, Win 8, or Win 10, the software will require the new USB drivers available here.
For Mac computers and Laptops, these products will only work on Intel processor machines running OS X and using Parallels Desktop, VMware Fusion, or Apple Boot Camp with Windows installed.
If you are running a '98 our later F150 or a 6.0L then no. You can adjust the tire size and gear ratio with your Gryphon programmer by using the Custom Options menu during programming.
If you are running a 7.3L, then you may need to have your tunes adjusted to compensate for the change in tires. This will depend on just how much difference there is between the old and new tires. Keep in mind that the 7.3L doesn't have correction in the PCM for the speedometer when changing tires so new custom files will not get your speedometer to read correctly.